In brief:
- Because capacitors store electrical energy, testing them requires adequate protection against the shock hazard.
- Poor power quality can degrade the performance of the normally robust power capacitors.
- Thermographic inspection of capacitor banks should reveal connection temperatures no more than a 20 °F above ambient temperature.
Power factor correction capacitors reduce energy costs by avoiding the premium rates that utilities charge when power factor falls below specified values. Facilities typically install these capacitors when inductive loads cause power factor problems. Capacitor banks normally provide years of service, but they need to be inspected regularly to ensure they’re working properly. Problems such as loose connections, blown fuses or failing capacitors can reduce the amount of power correction available and, in extreme cases, even cause a total system failure or fire. Here is how to inspect power factor correction capacitors and avoid these problems.
Safety first
[pullquote]Capacitors are energy storage devices that can deliver a lethal shock long after the power to them is disconnected. Most capacitors are equipped with a discharge circuit but, when the circuit fails, a shock hazard still exists for an extended period of time. When testing is required with the voltage applied, you must take extreme care. Capacitor bank maintenance requires training that’s specific to the equipment, its application and the task you’re expected to perform. In addition, the proper personal protective equipment (PPE) in accordance with NFPA 70E is required.
Additional hazards are involved in working with current transformer (CT) circuits, including the wiring and shorting block. The CT itself is normally located in the switchboard, not in the capacitor bank enclosure. Even after the capacitor bank has been de-energized, there’s a danger of electrical shock from the CT wiring. If the CT circuit is opened when there’s a load on the switchboard, the CT can develop a lethal voltage across its terminals.
What is power factor?
Power factor is the ratio of true power, measured in kiloWatts (kW), to apparent power, measured in kiloVolt Amperes (kVA). The apparent power is the total requirement that a facility places upon the utility to deliver voltage and current, without regard to whether it does actual work. Utilities usually charge a higher rate when power factor falls below a certain level, often 90%.
True power (kW) / apparent power (kVA) = power factor
50 kW / 52 kVA = 0.96 (a good power factor of 96 %)
50 kW / 63 kVA = 0.79 (a poor power factor of 79 %)
Motor inductance is the most typical cause of poor power factor, and the problem increases if motors aren’t loaded to full capacity. Harmonic currents reflected back into the systems also reduce power factor.
Measuring power factor requires a meter that can measure voltage, current, power and demand simultaneously over at least a one-second period. A digital multimeter (DMM) can’t perform these measurements, but a power quality analyzer used with a current clamp can measure all of these elements over time and build an accurate picture of power consumption. A power logger, another type of power quality tool, can perform a 30-day load study to provide an even better understanding of power factor and other variables.
Low power factor can be corrected by adding power factor correction capacitors to the power distribution system. This is best accomplished via an automatic controller that switches capacitors, and sometimes reactors, on and off. The most basic applications use a fixed capacitor bank.
Under normal conditions, capacitors should operate trouble-free for many years. But conditions such as harmonic currents, high ambient temperatures and poor ventilation can cause premature failures in power correction capacitors and related circuitry. Failures can cause substantial increases in energy cost and, in extreme cases, produce the potential for fires or explosion, so it’s important to inspect power factor correction capacitors regularly to ensure they are working properly. Most manufacturers post the service bulletins on their websites. Their typical recommended preventive maintenance interval is twice annually.
Inspection with infrared imager
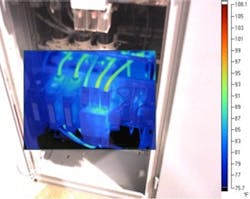
The most valuable tool for evaluating capacitor banks is a thermal imager (Figure 1). The electrical distribution system should be operating for at least an hour before testing. To begin, check the controller display to determine if all the stages are connected. Next, verify that the cooling fans are operating properly. Conduct an infrared examination of the enclosure before opening the doors. And, based on your arc-flash assessment, wear the required personal protective equipment.
Figure 1. A thermal examination would have detected abnormal heating, and damage to a circuit breaker feeding a capacitor bank might have been avoided.
Examine the power and control wiring with the thermal imager, looking for loose connections. A thermal evaluation can identify a bad connection by showing a temperature increase caused by the additional resistance at the point of connection. A good connection should measure no more than 20 °F above the ambient temperature. There should be little or no difference in phase-to-phase or bank-to-bank temperatures at points of connection.
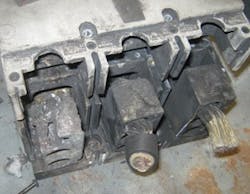
Figure 2. The difference in temperature indicates that the fuse on the left is blown.
An infrared evaluation can detect a blown fuse by highlighting a temperature difference between blown and intact fuses (Figure 2). A blown fuse in a capacitor bank stage reduces the amount of correction available. Not all correction units are equipped with blown-fuse indicators. If you find a blown fuse, shut down the entire bank and determine what caused the fuse to blow. Some common causes are bad capacitors, reactor problems and bad connections at line-fuse connections, load fuse connections or fuse clips.
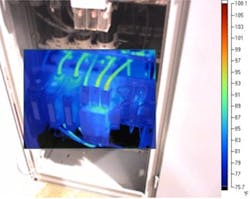
Figure 3. An infrared image can show that a capacitor is cooler, indicating it has failed.
Look for differences in the temperatures of individual capacitors. If a capacitor isn’t called for or connected at the time of examination, it should be cooler (Figure 3). Also, keep in mind that convection currents can cause component temperatures to be higher in the upper sections. But if, according to the controller, all stages are connected, then temperature differences usually indicate a problem. For example, high pressure might cause the capacitor’s internal pressure interrupter to operate before the external fuse trips, thus removing the capacitor from the circuit without warning.
Current measurements
As part of preventive maintenance, use a multimeter and current clamp to record the current on the three phases of each stage. Use the multimeter to measure the current input to the controller from the current transformer in the switchboard, using a current clamp around the CT secondary conductor.
Convert the measured current to the actual current flowing through the switchboard. For example, if the current transformer is rated 3,000 A to 5 A, and you measure 2 A, the actual current is:
2 A x (3,000 A/5 A) = 2 x 600 = 1,200 A
In addition, with all stages connected, measure the current through the breaker that feeds the capacitor bank to look for phase imbalance. Maintain a log of the readings to provide a benchmark for readings taken at a later date.
Capacitance measurements
Before measuring capacitance, de-energize the capacitor bank and wait for the period specified in the manufacturer’s service bulletin to allow the stored charge to dissipate. Follow your facility’s lockout/tagout procedure and wear appropriate PPE. Use a properly rated meter to confirm there is no ac present. Use a dc meter rated for the voltage to be tested and set to 1,000 Vdc to test each stage phase-to-phase and phase-to-ground. There should be no voltage.
The presence of voltage indicates that the capacitor might not be discharged fully. If you detect no voltage, use the meter to measure capacitance for each stage and compare the reading to the manufacturer’s specifications.
Visual inspection and cleaning
Perform a complete visual inspection. Look for discolored components, bulging or leaking capacitors, and signs of heating and moisture. Clean or replace cooling fan filters. Clean the units using a vacuum — never use compressed air. Perform an insulation integrity test from the bus phase-to-phase and phase-to-ground. The control power transformer line side breaker or fuses must be removed to prevent erroneous phase-to-phase readings.
Power factor correction capacitors are designed to provide years of service when maintained in accordance with the manufacturer’s instructions. Inspecting capacitor banks regularly ensures they are operating safely while delivering the anticipated energy cost savings.
Bennie Kennedy is a licensed electrical contractor and technical author for Fluke (www.fluke.com). He also serves as an OSHA-authorized general industry outreach safety trainer and instructor/curriculum developer for Prairie State College, Lakeland College, Joliet Junior College, and the Indiana Safety Council. Contact him at [email protected] and (219) 979-9939.


