Industrial fans play a critical role in a host of manufacturing activities, including the production of steel, paper, cement and pharmaceuticals. Fan problems, however, can reduce productivity and even bring production to a halt.
Bearing failure analysis demonstrates that most fan problems are preventable. Often, they can be traced to mistakes associated with fan bearing installation or lubrication, such as tightening locknuts while bearings are loaded or filling bearing pillow blocks with excessive amounts of grease. The following recommendations can help you avert common bearing-related mistakes and keep the fans in your facility running efficiently.
1. Get oriented
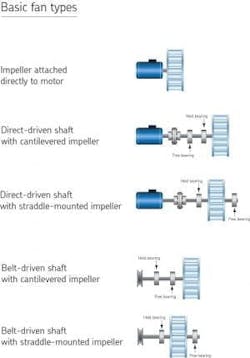
One cause of fan failure is confusing the fixed and floating bearing positions. A typical fan has two bearings supporting the shaft. In most cases, the bearing exposed to the highest radial load should be fixed, or axially held, within the housing. Radial bearings generally perform better when the axial-to-radial load ratio is low.
Also, the axial force needed to float a bearing is lower when the radial load is lower (axial force to move bearing = coefficient of sliding friction x radial load) (or Fa = µ x Fr). The fan’s other bearing should be allowed to float internally or within the housing bore, thus accommodating shaft expansion and contraction.
In most fan applications, the bearing closest to the motor or belt drive has the highest radial load and should be the fixed bearing. This is the case in most of the common centrifugal fan arrangements - overhung belt-driven, center-hung belt-driven, and center-hung direct-driven fans. Figure 1 shows the motor, bearing and rotor locations in common centrifugal fan arrangements.
Overhung direct-driven fans are an exception to the rule. Here, the bearing close to the motor is nearly unloaded and should be allowed to float. The bearing farther away from the drive handles the heavier radial load and should be fixed in the housing.
Another case in which it might not be appropriate to fix the most heavily loaded bearing is when the fan rotor has a very tight clearance with surrounding structure (typically the inlet cone) in an overhung fan arrangement. Here, it’s sometimes necessary to fix the rotor side bearing so that thermal expansion and contraction of the shaft doesn’t cause the rotor to rub.
Recently, at a steam-generation plant, roller bearings in an overhung, direct-drive fan failed within two months of installation. Production came to a halt while a replacement fan was brought on-line. The cost of the shutdown was significant in diminished productivity and output.
The initial inspection revealed that the fixed and floating bearing positions had been reversed during installation. The more heavily loaded bearing, which should have been axially held, was allowed to float; the other bearing, which should have been free, was fixed within the housing. As a result, roller skidding occurred during operation, leading to high bearing operating temperatures, oxidation of the bearing’s lubricant, and ultimate bearing failure.
Identifying the fixed and floating positions and correctly installing the replacement bearings solved the problem and improved bearing life expectancy in the application.
2. Use the right tooling
You must use the right tools to avoid damaging the bearings. Recommended installation tools include a set of feeler blades to determine bearing clearance measurements, a steel hammer and a hook spanner wrench. A fan bearing often is installed inside a pillow block housing, on an adapter sleeve. The pillow block housing limits access to the bearing locknuts and precludes using hydraulic mounting devices. Specialized hook spanners, available from bearing manufacturers, provide better access to the bearing within the pillow block base. These tools allow installers to grip locknut notches securely and rotate the locknut within the housing.
Avoid using tools made of softer metals such as aluminum or brass when installing fan bearings. Pieces of the softer metal can flake off during mounting and lodge in the bearing, causing premature failure.
3. Measure consistently
When measuring a bearing’s radial clearance, designate one technician to perform all measurements. To obtain the correct hoop stress on the inner ring, maintenance technicians should take a series of radial clearance measurements when mounting a tapered bore roller bearing. Failing to do so could result in the bearing spinning on the shaft during operation.
No two workers have an identical touch with feeler blades. To ensure consistency, the same person should perform the clearance measurements on a bearing. A bench clearance can be taken when the bearing is removed from its packaging. This verifies that the bearing was manufactured according to the correct specifications.
The starting radial clearance is measured with the bearing loosely positioned on the shaft and under shaft load. Subsequent clearance measurements also are taken while the bearing is under load. Using a moderate amount of force, the technician inserts a feeler blade through the gap at the 12 o’clock position between the topmost bearing roller and the bearing’s outer ring. The objective is to insert the thickest blade possible through the gap. The clearance should be taken on one roller set at a time. This method establishes the initial radial internal clearance.
This clearance reading serves as the baseline to measure subsequent reductions in clearance during mounting. For example, if the starting radial clearance is 0.008 in. and the recommended clearance reduction is 0.003 in., then the clearance should be reduced until a feeler blade measuring 0.005 in. is the largest blade that can fit through the gap.
4. Don’t drag the rollers
After measuring the initial radial clearance with the bearing under load, raise the shaft with a jack to unload the bearing. Then the locknut can be tightened and the bearing driven up the adapter sleeve. Inadvertently loading the bearing at this point causes the bearing rollers to drag across the roller paths, thus scoring the roller paths and damaging the bearing before it’s even operational. Verify that the bearing is unloaded by rotating the bearing’s outer ring manually; it should easily turn within the housing bore.
Once the bearing has been driven a certain distance up the adapter sleeve, lower the shaft to take another bearing clearance measurement. Repeat this process until you’ve achieved the desired clearance reduction.
After installation, completely pack the bearing with grease. Fill the base of the pillow block to a level equal with the bottom of the shaft. Newer pillow block varieties sometimes have cast-in markings to indicate the correct grease level. Don’t overfill the pillow blocks. Just as a person experiences more drag when wading in waist-deep water than in ankle-deep water, overlubrication causes more frictional churning and drag inside the bearing, resulting in higher internal friction and operating temperatures and a loss of lubricant viscosity.
5. Add the lube
Fan bearings should be periodically relubricated. It’s best to relubricate with smaller grease quantities at more frequent intervals. Relube software can estimate the recommended relubrication interval and grease quantity based on factors including bearing type, size and fan speed. These programs can reduce the risk of overfilling when relubricating. For example, if the relubrication program recommends adding 1 oz. of grease every month, the best approach would be to inject 1/4 oz. weekly.
Once the fan bearings are back in operation, monitor them for changes in vibration and operating temperature. Bearing lubricant can retain heat, causing operating temperatures to rise. If you detect high temperatures, change out the old grease, thoroughly clean the fan bearings and housings, and refill with the initial grease filling. Even if operating temperatures remain normal, it’s a good idea to annually replace old grease during planned maintenance shutdowns.
Figure: SKF USA Inc.

