Top five tips for improving your TIG welding efficiency
By its very nature, TIG welding is a relatively slow process. But it is also a very versatile one. In fact, it can be used to weld more materials than any other welding process, even exotic and heavier alloyed metals. It’s also well suited for thin materials, as it generates a low heat input to prevent burn-through. No matter the application, when done properly, TIG welding can provide extremely high weld quality.
Achieving such positive results, however, isn’t always easy — it’s as much a matter of training and practice as it is simple patience. Fortunately, arming yourself with a few tips along the way can help you greatly improve the efficiency of the process.
Invert the process
Using an inverter power source is one of the first steps you can take to improve TIG welding efficiency. Inverters operate by switching high-voltage low-amperage alternating current (AC) into direct current (DC) back and forth at a very high rate of speed — up to 50,000 times/second. The overall result is a smooth arc that provides consistent welding performance.
Inverters also have frequency controls that allow you to determine the length of time that it takes the unit to complete one full current cycle (the combined time spent on electrode positive and electrode negative) and adjust the frequency from 20 Hz - 400 Hz. (Note: Transformer-based power sources only produce an output of 60 Hz, which is the same frequency that comes from the wall power receptacle).
The inverter’s frequency feature helps improve your welding efficiency by narrowing the focus of the arc, which, in turn, creates a narrower weld bead and minimizes the heat-affected zone. With this feature, you will need less time and filler metal to complete the weld and can also obtain faster travel speeds. By reducing the heat-affected zone, you can minimize the chance of burn-through and the need for rework.
Inverters also feature a balance control, which allows you to adjust how long the current spends in each part of the AC cycle and is especially useful if you are welding aluminum. You can adjust the balance control toward the electrode positive part of the cycle to gain more cleaning action (removal of the oxide layer) or toward the electrode negative to gain greater weld penetration and faster travel speeds that allow you to finish the job sooner.
Stay cool and flexible
Selecting the right TIG torch for your application can also help make the process more efficient. First, select a torch with good insulation. Silicon rubber insulation, for example, protects against high frequency leakage and/or cracking that may lead to premature torch failure and downtime for torch changeover.
Also, determine whether you need an air- or water-cooled TIG torch. Air-cooled models can be used on low amperage applications, or those below 200 amps. They are the best option if you are welding very thin materials, under 3/16 inch, and/or need to be able to move from one area to another easily, as they do not require an external cooler. You should consider a water-cooled TIG torch for applications over 200 amps. This type of torch helps prevent overheating and allows you to achieve faster travel speeds — both factors that let you put down more weld metal in less time.
When selecting a TIG torch, also consider the angles that you need to weld since maneuvering around difficult joints can be time consuming, not to mention uncomfortable. Most TIG torch manufacturers offer models with flexible necks that are good for welding in particularly tight joints or awkward positions. Some torch body styles also feature a modular design, which allows you to add a flexible neck and different head angles to an existing torch. These kits provide good joint access and can lower downtime associated with changing over different torches for multiple applications.
Cover yourself
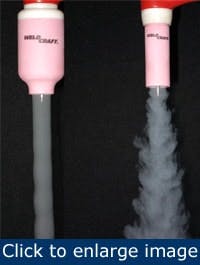
The photo on the left shows the even shielding gas flow a gas lens provides compared to a TIG torch without a gas lens (right).
When possible, use a gas lens. A gas lens replaces the collet body in a TIG torch to help hold the tungsten in place and creates the electrical contact necessary for proper current transfer. It also provides two other functions that can help you improve your efficiency: it improves shielding gas coverage and provides you with better joint accessibility.
Gas lenses are typically comprised of a copper and/or brass body that contain layered mesh stainless steel screens. These screens distribute the shielding gas evenly around the tungsten and along the weld puddle and arc to help prevent oxygen contamination that could lead to weld defects. As in any welding application, lowering defects and their associated rework ensures you can spend more time welding and increasing your productivity.
Gas lenses also allow you to extend the tungsten electrode further out from the nozzle. This additional electrode extension provides better visibility of the joint and arc, allowing you to have greater torch control and achieve better weld quality especially on critical applications and/or hard-to-reach areas such as “T”, “K” and “Y” joints.
Gas lenses are particularly helpful when TIG welding on alloys that are highly reactive to atmospheric contaminants or on materials used in high temperature applications. They can also be used with all types shielding gases and are available for both air- and water-cooled TIG torches.
Less can be more
Preventing overwelding can significantly improve your TIG welding efficiency, and it can save you money, as well. Overwelding occurs when you place more weld metal in a joint than required to obtain the necessary weld strength. It is often the result of poor joint-fit up or preparation, improper weld parameters, or simple overcompensation.
Overwelding, unfortunately, wastes shielding gas and filler metal, and it increases welding time. For example, overwelding a fillet weld by 1/16 inch can increase your arc-on time anywhere from 36% for a 3/8-inch fillet weld to 125% for a 1/8-inch one. In addition, overwelding increases the heat input into the base material and with it raises the risk of burn-through or distortion that will require costly and time-consuming rework. It may even increase the need for grinding and finishing, too.
[pullquote]To prevent overwelding, be certain that the joint you are welding is not ‘over-designed.’ That means that you are not using a larger joint than necessary to gain the appropriate strength for the application. A good rule of thumb is to make the leg of a fillet weld no wider than the thickness of the thinnest plate and weld accordingly. For example, when joining a 1/8-inch thick plate to a ¼-inch one, you only need a 1/8-inch weld bead. Also, know the size of the joint you are welding. When in doubt, don’t guess — use a fillet gauge instead.
Proper joint preparation and close fit-up are also good defenses against overwelding, as is welding vertical down on thinner materials.
Get to the point
The type of tungsten you select depends on the kind of power source you are using, as well as the material you are welding, but it can have a significant impact on your efficiency. So can the shape of the tungsten.
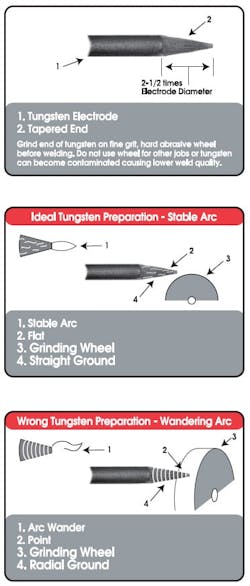
Figure 1: To achieve this shape (and to prevent contamination or arc wandering) grind the tungsten on a borazon or diamond grinding wheel specially designated for the purpos.
For AC and DC welding using an inverter, a pointed and/or truncated tip (for ceriated, lanthanated and thoriated tungsten) provides the stable arc needed to achieve good welding performance and quality. To achieve this shape (and to prevent contamination or arc wandering) grind the tungsten on a borazon or diamond grinding wheel specially designated for the purpose (see Figure 1). Next, grind the taper on the tungsten to a distance of no more than 2.5 times the electrode diameter (for example, with a 1/8-inch electrode, you would grind a surface 1/4 to 5/16 inches long), as this eases arc starting and helps creates a more focused arc.
When welding with lower amperage on thinner materials (those ranging from .005 to .040 inches), it is best to grind the tungsten to a point. A pointed tungsten allows the welding current to transfer in a focused arc and helps prevent distortion. Pointed ceriated tungsten, in particular, works well when welding aluminum, as it provides 30 to 40% more amperage capacity than pure tungsten before it begins to melt. Do not use a balled tungsten for such an application.
On higher current applications, grinding the tungsten to a truncated tip can help with your welding performance by preventing the tungsten from balling. First, grind the tungsten to a taper as explained above. Then grind a .010- to .030-inch flat land on the end of the tungsten. (Note: If you are grinding thoriated tungsten, make sure you control and collect the dust, have an adequate ventilation system at the grinding station, and that you follow manufacture’s warnings, instructions and MSDS.)
Remember, no welding operation is perfect. Still, with some know-how and a bit of practice, it can become more efficient — even if you are using a relatively slow process like TIG welding. The key is to make sound decisions about your equipment selection and take care with the size of the welds you are completing. Ultimately, taking that little bit of time upfront can save you time, and money, in the long run.


