Preventive maintenance is time-based maintenance, a routinely scheduled, time-based activity. (To define the word “time” used here, it can mean calendar-based, time-based, interval-based, or usage-based, whatever the set parameter is.) What needs to be understood is that PM tasks can be proactive or reactive depending on how they are utilized. PM, just like predictive maintenance (PdM), helps to find and identify symptoms and faults earlier within the failure curve. Reactivity treats those symptoms and faults, whereas proactivity gets to the root cause and puts methods in place to prevent the failure from occurring.
In a reactive environment, the idea of doing a preventative maintenance task (i.e., a PM) is to look over the machine to change parts as seen fit. Normally what happens is that the mechanic begins the PM and the first defect they come to, they stop the inspection, replace the part and neglect to finish the inspection because it took too long to replace the part. Then the PM is issued the next week and the same thing occurs, eventually leading to mechanics doing a PM and the machine still fails at start up, ruining the confidence that management and operators had in the maintenance department.
This ends up a run-to-failure strategy although PM is utilized to some extent. What’s more is the PMs are often very generic, containing statements like “Check the oil” or “Check the chain” creating more variability and inducing more failure into the machine. To make matters worse, there are normally multiple PM types forged into one PM, and the mechanic is given 8 hours to complete the PM with the expectation that they do the job as if they had 40 hours. Then, management gets mad at them when they do not get it completed, or if the machine fails that next day.
To my knowledge there are seven timed-based activities: inspections, adjustments, rebuild/overhaul, replacement, testing, calibration, and lubrication. These activities take place regardless of asset condition. In order to optimize PM work, there needs to be standardization within each PM: the types need to be separated, procedures need to be created for each activity, and it needs to be drilled into the mechanic to stick to the script as much as possible. This is a long and drawn out process and is not easy to do, but the way I look at it is that it is just work. It is not complicated work, just hard work.
Inspections
This is the most common PM type, and the overall goal of an inspection PM is to identify defects. Failures and defects found during an inspection constitute a work order to be generated whether by an operator or a mechanic. A work order will be generated for each failure found, along with the part needing replaced entered into the work order. These work orders then will be planned and scheduled to be completed when parts and time are available. This is corrective maintenance.
When you are in the reactive hole, it is a bit overwhelming at first, because of the number of defects that are found and loaded into the system. The ultimate goal is to restore all critical assets to basic conditions and put procedures in place to then maintain the assets at basic condition. Until your assets are at basic condition, you will never dig yourself out of the hole.
Also, there are normally two types of inspections (in the proactive world): operator inspections and maintenance inspections. Any inspection with the frequency of 30 days or less should be given to the operator. Any inspection greater than 30 days goes to the maintenance department. Speaking from a Total Process Management (TPM) perspective, the operator inspections focus on three areas: Cleaning, Inspection and Lubrication (i.e., CILs).
Mechanics, regardless of experience, are considered by most organizations as the Subject Matter Experts (SME) of the equipment within the facility. What I have reiterated to my mechanics is the importance of completing each inspection. If they do happen to come across a showstopper of a defect, then come back to it later or hand it off to the next shift if need be, but by all means, complete the inspection! I also tell them that that most defects come down to two things: the way an operator runs a machine and workmanship failures on behalf of maintenance. When you just change parts, most of the time you are introducing new defects without even knowing it!
How to optimize: Inspections are one of the most important PM types. It is critical that defects are identified as early as possible to give you time to plan and schedule the work. It is also important that the mechanic has certain tools to use during the inspection. For example, if the activity is to check the chain for elongation, it is critical that the mechanic has the tools and training to execute what you are asking.
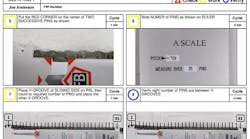
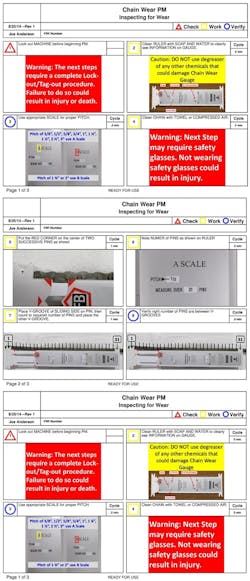
A great way to do this is with the use of a chain wear gauge. So now, on your inspection PM, where the activity states to check the chain for elongation, you would put “see attached procedure.” With it you will have the procedure on how to check the chain for wear, with the set standard of an acceptable range of wear, along with the next steps if anything were outside that range (Figure 1).
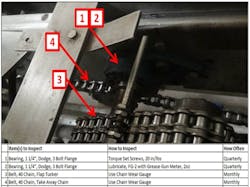
The next thing is to have mechanics take pictures of sections of machines and identify the wear points. Put that picture in a spreadsheet and have them write out each inspection point step. When completed, share it with other mechanics in the shop to make sure nothing is missed and have them all sign off that it is completed. Then this can be given to the planner/scheduler for updating in the system (Figure 2).
Repeat this throughout your system. Start with your most critical equipment and work your way through it. Make sure it is your mechanics doing the work and creating the procedures, so it will be their system and they will use it. When there is a failure, examine what was missed on the PM and correct or add to it. When the whole team signs off on it and there is a failure, now you have failed as a team. This helps alleviate finger pointing.
We also have begun to create Visual Work Instructions for each line item of the CIL so that there is a standardization that takes place. We gain best practices and consistency of defect identification, as well as the development of operator competencies when we have visual standard operating procedures and one point lessons. Just as we have, you will see an improvement in the overall equipment effectiveness of that particular line when you have a visual method of standardized work.
Adjustments
Adjustments, for the most part, are more frequent on the side of utilities rather than in production. Normally, due to shifts in weather, adjustments are made to equipment such as boilers, ammonia systems, and air compressors/dryers, with a goal to maximize the efficiency of these assets. There should be a documented procedure and associated best practice with each of these adjustments.
There are two ways that adjustments can be utilized in other areas of the plant. One adjustment PM could be to compensate for wear within a system or process and where you know that it will not cause a catastrophic failure, but extend the life of the part being adjusted. The second is changeovers. Size changes or product changes cause the machines to be adjusted. Documentation/procedures are needed here as well.
How to optimize: Adjustments need to have standard procedures. Maybe it is a changeover that requires a size change or time to turn the HVAC units from winter to summer, either way, the goal is to standardize the work. If you can get all people to execute work in the same fashion, you reduce variation.
An example would be to adjust the take-up on a conveyor or timing on a machine. There needs to be documentation on the adjustments made as well as what the current state was before adjustment. This will help you with understanding whether your PM frequency needs adjusted, where the component needs to be set when replaced, and determine when it is time to change the component.
Rebuild/overhaul
Rebuild vs. overhaul – what’s the difference, if any? The way I define a rebuild is when you decide to tear down a piece of equipment and replace every component regardless of condition, with a goal of to restoring equipment to basic condition. An overhaul would be when you tear down a piece of equipment and check the wear of each component to decide whether or not to replace it.
Although rebuilds are typically associated with major equipment downtime and a complete tear down and rebuild of a machine, this isn’t the only case. There are multiple uses for a rebuild PM. An example is based on the mean time between failure (MTBF) of a vacuum pump, which would determine when you should pull the pump, replace it with a spare, and rebuild the pump to put back in inventory. These are considered “rebuildable spares”. When you have a rebuildable spare in your EAM or CMMS system, you will want to list the asset as an asset location instead of as the asset itself. The asset number will apply to the location where the rebuildable spare is sitting instead of listing each individual pump as an asset.
How to optimize: Rebuilds and overhauls need to be data driven. Also, there should be an initiative to find the root cause. For example, in order to mitigate failure, a mechanic knows to replace the vanes in a vacuum pump every 6 months because they will become brittle and break causing the pump to lock up. This is great for the short term, but a long term solution is in need.
In order to fix this problem, there needs to be an RCA completed to determine the root cause. It could be that the pump needs upsized, thus fixing the problem. When a root cause can’t be found or it has been determined that the asset has reached its useful life, it is then that the determination is made to either rebuild or replace. Be sure to capture the cost savings/avoidance of these repairs as well. The best thing to do here is to do these in-house. It is worth it to bring out an OEM or a vendor when doing your first one. Then, be sure to document it every step of the way so next time you can do it in house with minimal mistakes.
Replacements
Replacement PMs are for inexpensive things like air filters or socks for a bag house. Air filters could be a weekly, biweekly, or monthly PM depending on criticality. We do all of our socks for our silos semi-annually. This also includes small components like breathers on blowers or gearboxes, or even run-to-failure parts like a motor for an exhaust fan in the warehouse (any non-critical, determined to run-to-failure components).
How to optimize: There is not a lot that can be done here to optimize outside of buying quality items like air filters to extend the PM, or finding root causes that cause these items to be changed more frequently than desired. For example, going from fluorescent light bulbs to LED’s is one way of extending the PM so that you free up resources to do other work.
Testing
Tests are used to verify that equipment is performing according to specifications and are often associated with safety controls or environmental equipment. One quarterly PM we do is the testing of door safety switches on our packaging equipment. Other examples include testing the water level safeties in our boilers, EXIT light testing, and testing our sampling equipment like CO2 monitors and ammonia detectors.
Documentation is often required when performing these types of tests. There should be a form with a checklist of each item to test, the date of the test, the result of the test, and a signature of who performed the test. This form should be filed and/or uploaded into your CMMS, EAM and/or PSM system.
How to optimize: Testing is similar to replacements in that there is not much to optimize here. It could be that you order higher quality items here as well. The best way to optimize is to create accurate procedures and ensure that all stakeholders are trained to the procedures.
Calibration
Calibration is a special form of preventive maintenance whose objective is to keep measurement and control instruments within specified limits. Proper calibration of an instrument allows people to have a safe working environment and produce valid data for future reference.
In the food and pharmaceutical industries, as well as others, it is absolutely essential that calibration be an integral part of the manufacturer’s quality and safety program. Almost all regulations and management standards that address food quality and safety include language that stresses the importance of calibration. Also, a standard must be used to calibrate the equipment; for example, FDA calibration requirements can be found in Section 21 of the Code of Federal Regulations (21 CFR).
There are a few things to remember and follow:
- Both ISO standards and FDA requirements call for using written calibration procedures. You must have a written procedure (and it needs to be adhered to). When inspected, you will be asked to present the Standard Operating Procedure (SOP) for your calibrations.
- Although the tech or manager does not need to have the procedure memorized, they must know where to find the information needed to perform their job. The information must also be readily accessible.
- Once the procedure is created, it must be adhered to. The calibration interval should be based on the OEM’s recommended interval. If initial records indicate that the equipment remains within the required accuracy for successive calibrations, then the intervals may be lengthened. On the other hand, if equipment requires frequent adjustment or repair, the intervals should be shortened. Any equipment that does not have specific calibration intervals should be examined at least every six months and calibrated at intervals of no longer than one year.
A record system should be kept on every instrument, including the following:
1. Equipment Identification
a. Present Location
b. History of Maintenance and Repairs
c. History of Use
d. Accuracy
e. Actual Values of Latest Calibration
2. Dates of Calibration
3. The Name of the Person Performing the Calibration
4. Next Calibration due date
5. Calibration Procedure
6. Tag with a reference number on the piece of equipment that refers to the corresponding piece of equipment in the log.
How to optimize: With calibrations, it is more of the same. Procedures and training are your best bet. Also, if you create a calibration route that you can streamline to minimize movement and optimize completion efficiency. You also will want to document all of this in your CMMS or EAM systems. It will make it easier for you and your quality department to pull the records when needed.
Lubrication
Keith Mobley, in his book Maintenance Fundamentals, states that friction-related problems cost industries over $1 billion per year, adding that the thing to remember about lubrication is to implement “the right cleanliness, dryness, temperature, people, oil/grease type, amount, frequency, practices, and procedures on a consistent basis.”
Information for developing lubrication specifications can come from four main sources:
- Equipment manufacturers / OEMs – OEMs are hit and miss; because most companies are not world class, they do not use world class vendors or OEMs. Therefore, finding an OEM that has extensive knowledge of lubrication can be difficult. There are some great ones out there as well. Some will provide lube maps, color coding for either lubrication frequency or lubrication type, as well as best practices to extend their asset’s life.
- Lubricant vendors – it is my experience that the best resources to utilize for your program are proactive lubricant vendors. These vendors are sometimes hard to find because it is so area specific, but you can learn a lot by partnering with them to achieve success.
- Lubrication subject matter experts (SMEs) and 4. your own trained experts – I have always found that using third party experts that have no interest in selling you materials (like the Noria Corporation) and having your own trained experts’ onsite have been the most beneficial to helping me drive my lubrication programs to world-class. SMEs love to share their knowledge with you and most want to see everyone be successful. Also, experience gained under these experts, in your own facilities, can be one of the best teachers.
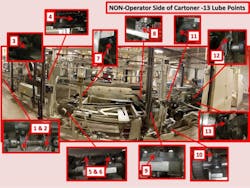
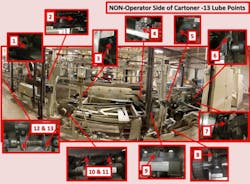
How to optimize: With lubrication, the key is training, procedures, and lubrication maps. The lubrication route should be optimized as well. Movement is a form of waste that needs to be eliminated. The lubrication maps should reflect this as well. For example, the first route in Figure 3 is all over the machine, whereas the second shows a better route starting from one end of the machine and ending at the other.
Also, we have our operators lubricate some of their machines as a part of their startup procedures. We have grease gun meters with color coded grease guns, color coded tags on the grease gun to match grease type, and color coded zerk covers to match grease type (Figure 4). We also have Lubrication Maps and a Lubrication Schedule that they utilize. We have a standard for greasing as well. For example, our standard for bearings is 2 grams of grease. With the mechanics, they own any frequency longer than thirty days. Also, our reliability technicians utilize precision lubrication for some of our more critical assets. For example, we have mills that we use Ultrasound Technology coupled with a grease gun caddy to make sure we are precise.
The end goal
The key to PM optimization is to have a procedure in place for every activity, set standards, visual aids, and training, along with the expectation that they are followed. As a manager, you have to follow up as well. You will do this through auditing. This doesn’t have to be complicated.
So what is it that we want to accomplish with optimization, and what is the expected outcome in order to sell the value of such an initiative?
- Improved wrench time through waste elimination. Wrench time will be improved when PM’s are optimized, freeing up your resources to complete more work.
- Increased OEE because of minimized mistakes. Mistakes will be minimized because you have a procedure to follow to complete the task. If a mistake is made, it is one of two reasons:
- Failure to adhere to the procedure – this requires accountability. When you have developed procedures, you now have a developed system of accountability as well. Most organizations want to blame employees for mistakes when these organizations do not have a system in place to hold them accountable to. When you have a system in place, and when administered correctly, there are no favorites, only right and wrong.
- Failure to capture failure point in the procedure – this requires continuous improvement. Discuss what was missed as a team and correct it as a team. Move on from it as quickly as possible.
- Increased OEE because of standardized work. Standardized work helps with a few items: Minimized mistakes, minimized time on the job, maximized efficiency in job completion, and maximized competency development to name a few.
- Increased reliability / higher MTBF. Increased reliability means increased volume, which in turn means product produced at lower cost, which leads to the opportunity to increase market share, thus gaining more volume and resulting in higher profits.
- Decreased safety risk. When reliability is improved, risks of safety incidents are reduced. When machines do not break, people are not in harm’s way as often, thus mitigating the risk.
- Decreased quality risk. When reliability is improved, risks of quality incidents are reduced. When machines do not break, people are not in harm’s way as often, thus mitigating the risk.
In conclusion, what needs to be understood is that the operations department is giving you the time to work on the equipment and they expect a return on their investment. If you do not provide that return, they will not want to invest in your department anymore and will cringe at the very thought of you working on their equipment. Another thing to be understood is that as a rule of thumb the more the machine is touched, the higher the chance of inducing failure into that machine. Some say that 90% of failure is human induced, so it is key that you understand the basics of PM and how you can begin your move to a more proactive approach.
From my perspective, in order for the maintenance department to be successful, it has to have a great working partnership with the operations department (and all departments for that matter). Your focus should be two-fold: asset availability and training of the operators. The key is to understand a few things when it comes to dealing with operations:
- They are your customer. You are there to provide them a service. The service you provide is training of the operators. Think of it as being an internal consultant for the company. It is the job of maintenance to train the operators and to help develop their competencies to the point that they can take on small maintenance tasks up to and including cleaning, tightening, inspections, adjustments, lubrication and small repairs.
- The other service you provide operations is asset availability. It is the job of maintenance to ensure that an asset is available to operations when it is needed. The key is to keep the pressure on the operations department to utilize the asset when it is available.
Let me say that I have been on the other side of the coin to the point that no matter what I tried to do, I could not get the buy in of a processing or quality manager and it did hinder progress within my department. So let’s get real here. Here is my advice (take it or leave it):
- I get all the excuses as to why you can’t do something, but just push through it and just do it. You don’t need permission to do most things within your department. That is why they hired YOU! They expect you to make it happen.
- When you share your vision of your department (new or renewed vision) with others, understand who is for you and who is against you. Some people are for you even though they do not believe you can get there. Others will be adamantly against you because they do not like change. Mark those that do not like the change and try to draw them in by asking what you can do to make your department better. The goal is to implement your strategy by getting them to think that it is theirs or that you have at least valued their input. They may or may not buy in, but if you do not try, you will definitely never know.
- If all else fails, take care of you and your people. Do everything within your power to turn around your department. As you progress in downtime reduction and increase asset availability, it puts pressure on every other department to perform, change and improve. It takes the pressure off of you and puts it on them. It is then that you can offer your assistance to help them.
He is a CMRP, CRL, CARO, MLT2, MLA1, LSSGB, IAM-55k, CRL Black Belt and was recognized as one of the top 50 leaders in the country by the United States Congress, being awarded the National Leadership Award.
Most organizations have 3 typical problems: People issues, process issues, or profitability issues. Which is most important to your organization? Which one would you like help with? Please contact [email protected] with any questions or comments.
